
Wiring or rewiring a sewing machine is no more difficult than wiring most any other electric device.
Here is where I need to put a warning, electricity is a tool used to make life easier and power different types of devices. Any time you are repairing electrical devices of any type, it is recommended to turn off and unplug them first to prevent electrical shock, fires or possible death.
Understanding how electricity works is essential for trouble shooting and testing purposes when the electrical circuit quits working, as well as safety.
In simple, basic terms electricity is the flow of electrons through a conductive device such as wire. The flow of electricity requires a positive and negative, such as a batteries positive and negative terminals being connected or a live wire touching a ground, which is a complete circuit.
Without both a positive and negative electricity cannot flow.
Add a light or a motor in the circuit and now there is a load. Add a switch and now there is a way of opening the circuit which turns the flow on and off. You can see in the gif how the power flows from the positive side of the battery through the switch to the light and back to the negative side of the battery.
The switch can be on either side of the load (light or motor) and everything still works the same.
?????????????????????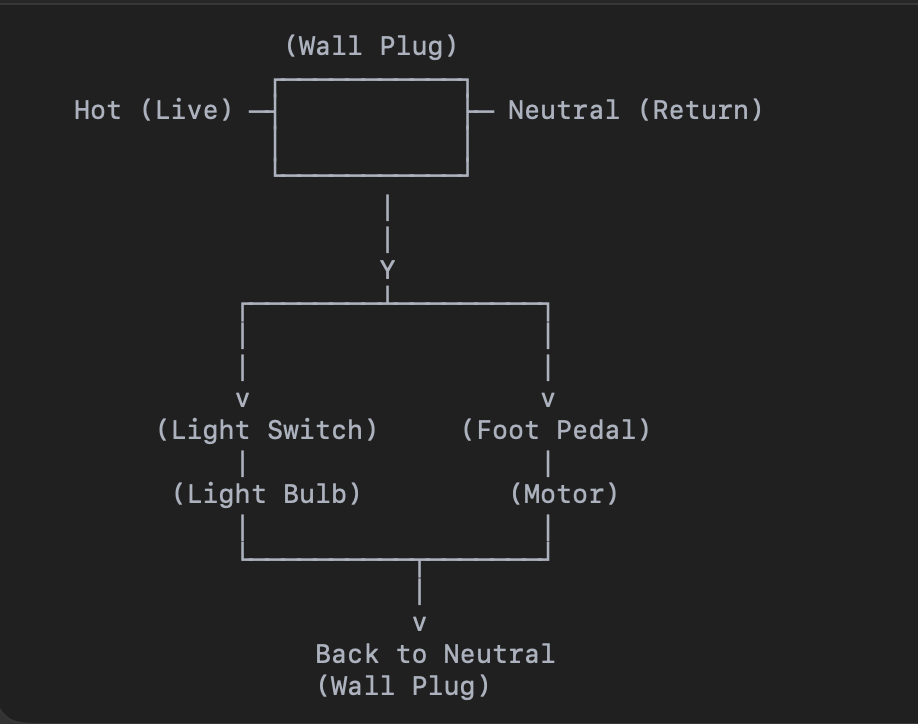 ????????????????????????In a sewing machine there are two circuits combined into one. The hot wire comes from the plug, Y's off into two circuits, one side goes to the light switch then the light then the neutral goes to negative side of the plug, the other side of the hot goes to the foot pedal, to the motor and then the negative ties into the negative coming from the light.
If there is a knick in the wire then you can put electrical tape on it or put liquid electrical tape on it for a more permanent repair.
If the cord is completely broken or cut I recommend making a permanent repair that will not come apart or have the tape slide off of and electrocute someone or cause a fire.
The old way is to use butt connectors with shrink tubing, there is a newer
easier way to connect the wires, it is a permanent repair and is safe. You strip both sides of the wire back half to three quarters of an inch, then slide a solder seal over one of the wires, twist the two wires together, slide the solder seal over the bare wire, and use a heat gun to seal and solder at the same time.
Refer to the video for more information.
If replacing all the wiring it can be a little difficult to understand or navigate the wiring when plugs are added in the mix, I will do my best to explain it.
On older Singer machines with 3 wire plugs, usually the two outside connectors are the hot and ground with the center wire connecting to the foot pedal or motor, depending whether it is the female side that is connected to the foot pedal and plugs into the wall or the male side which is normally attached to the machine.
Other machines such as Kenmore's the left and center connectors are hot and ground with the right side being the foot pedal and motor, I recommend using a multimeter to make sure which wire goes where, it is possible the machine has been rewired previously and the wiring is different than how the manufacturer originally set it up so make sure you double check how the wires are run.
Here is a video to help better understand the process.
If you have any questions put them in the comments.